1a. There are many different types of bones that can be used in an armature system, and they are shown below:
- Deform Bones: These types of bones are allowed to affect the mesh of an object, and are the default type of bones used in Blender
- B-Bones: This stands for Bezier bones, which means these types of bones can be bent and twisted, as they can be broken into multiple segments. An example for using this type of bones would be for a spine, or a ball-and-socket joint.
- IK Solvers: Based on Inverse Kinetics, and works on the basis of depending on where the tip of the bone 'chain' is, it will reposition the other bones connected to that chain.
- Stride Bone: In relation to a human skeleton, these types of bones are used to ensure that a foot would be placed relative to the stairs it is walking up, for example.
- Ipo Drivers: stands for InterPOlation driver. By associating a bone's position with an Ipo driver, the bones can now control any animatable property of the object.
1b. An armature constraint is one which would restrict the movement of a bone, to appear realistic (an example in a human skeleton would be not allowing the knee joint to bend forward, so the toes could touch the thigh).
There are many different types of constraints:
- IK Constraint, Copy Location/Rotation/Scale, Track-to Constraint, Floor Constraint, Stretch-to Constraint, Action Constraint.
Building an armature
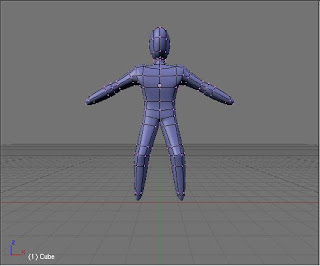
We started with the below model as our base model:
Next step to now get a posable model was to begin adding the bones, this was done by adding an 'armature' to the model (using the spacebar menu), as shown below:
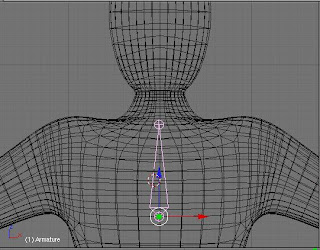
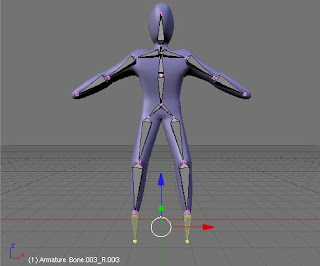
Here you can see a bone is placed in the middle of the chest. Continuing, we then added other bones, relevant to where on a human body they would be. Obviously we did not add as many bones as there are, but the major groups, especially where joints are, once this was done, this is what we ended up with:
To make these bones affect the mesh they were contined within, we now had to add a modifier, the armature modifier to be precise. This produces tube like structures, with a white shadow around them. These white shadow are the areas affected by that particular bone, and can be enlarged or reduced, by selecting the bone and the holding Alt+S. This is what we did, shown below:
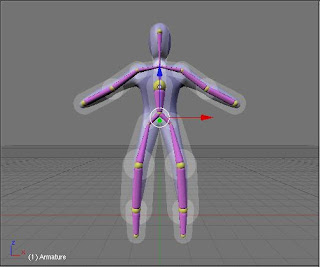
The final stage was to increase the size of these envelopes, and the 'white shadows' around them so as they enclose the whole body mesh, or else they wont fully affect the body, creating unrealistic looks when posing the body. Once that is complete, we enter Pose Mode, which allows us to create a pose for the model. The first picture shows the whole body mesh enclosed, and the second picture shows the bones as sticks (this makes it easier to pose, as it looks less cluttered than the envelopes.
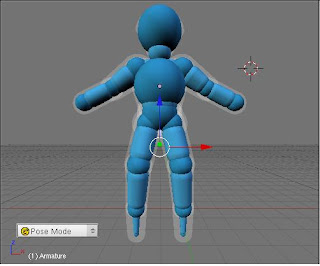
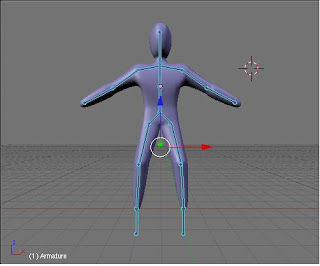
This final picture is now posable.
Assignment Update
Storyboard concept has been created, along with basic sketches of what we would like our character to look like. Rough sketches of the storyboard have been made on paper, and final sketches will be made soon.
Building an armature
We started with the below model as our base model:

Next step to now get a posable model was to begin adding the bones, this was done by adding an 'armature' to the model (using the spacebar menu), as shown below:

Here you can see a bone is placed in the middle of the chest. Continuing, we then added other bones, relevant to where on a human body they would be. Obviously we did not add as many bones as there are, but the major groups, especially where joints are, once this was done, this is what we ended up with:

To make these bones affect the mesh they were contined within, we now had to add a modifier, the armature modifier to be precise. This produces tube like structures, with a white shadow around them. These white shadow are the areas affected by that particular bone, and can be enlarged or reduced, by selecting the bone and the holding Alt+S. This is what we did, shown below:

The final stage was to increase the size of these envelopes, and the 'white shadows' around them so as they enclose the whole body mesh, or else they wont fully affect the body, creating unrealistic looks when posing the body. Once that is complete, we enter Pose Mode, which allows us to create a pose for the model. The first picture shows the whole body mesh enclosed, and the second picture shows the bones as sticks (this makes it easier to pose, as it looks less cluttered than the envelopes.


This final picture is now posable.
Assignment Update
Storyboard concept has been created, along with basic sketches of what we would like our character to look like. Rough sketches of the storyboard have been made on paper, and final sketches will be made soon.


 It is just a basic house with a very simple tree outside, but it shows use of polygons.
 As you can see there is a lot more detail in the picture on the directly above, as we subsurfaced the whole scene.

 ( The basic snowman)